.png)

Delta Sama Jaya Sdn Bhd
23G & 23M, DSSB Building,
Jalan Perdana 6/8,
Pandan Perdana,
55300 Kuala Lumpur,
Malaysia.
+603 9286 6328
+603 9281 3778
+603 9282 4007
+603 9281 3778
+603 9282 4007
+603-9287 0705
Graphite Mold
| Previous | 1 / 7 | Next |


Graphite Mold (Type A , B , C and D)
The mold made of graphite and specially designed for exothermic weld to obtain a nice welding ''nugget'' in any of various forms “Adequate
maintenance can prolong life-time of the mold more than 50 times used.”

Remember to clean the mold by gently rubbing the slag from the mold using a mold scraper and cleaning brush.
WARNING !
DSSB products shall be installed and used only as indicated in our product instruction sheets and training materials. Instruction sheets are available upon request. Improper installation, misuse, misapplication or other failure to completely follow instructions and warnings may cause product malfunction, property damage, serious bodily injury and death.
maintenance can prolong life-time of the mold more than 50 times used.”
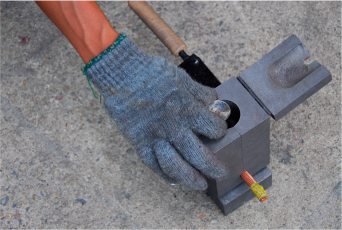
Preheat graphite mold for minimum 2 - 3 minutes.
After that , assemble the handle clamp to the mold and
do not over tighten the assembly.

After that , assemble the handle clamp to the mold and
do not over tighten the assembly.
Clean the conductor/ earth rod/ copper bar with a clean steel brush.
For copper bar, use sandpaper or grinder to clean the surface lightly.
Then Preheat all the surfaces of the metal bar, copper tape and conductor at least for a minutes
.

For copper bar, use sandpaper or grinder to clean the surface lightly.
Then Preheat all the surfaces of the metal bar, copper tape and conductor at least for a minutes
.
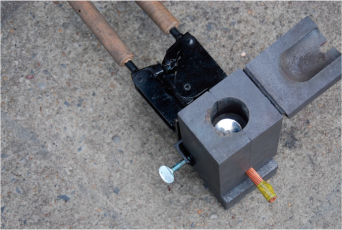
Fit the conductor and rod/ tape snugly into yhe mold.
Set the graphite mold and conductor / metal in a flat stable position.
Lock the mold together tightly using the handle clamp.

Set the graphite mold and conductor / metal in a flat stable position.
Lock the mold together tightly using the handle clamp.
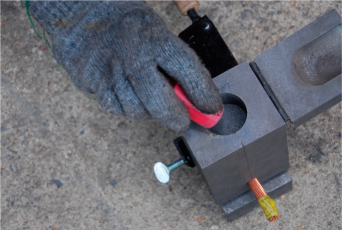
Put the metal retaining disk into the mold.
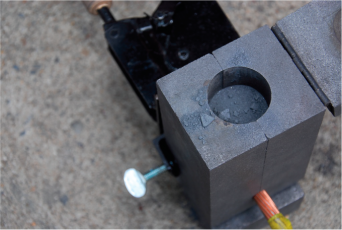
Placed it at the bottom of the crucible for holding the welding material until the reaction takes place.
Placed it at the bottom of the crucible for holding the welding material until the reaction takes place.
Check to make sure the disk is in its correct position.
Gently pour in the recommended size (gm) of the welding powder into the crucible / mold.

Step 8
Gently tap at the base of the container against the mold so that it will loosen the ''Starting Powder'' at the base of the plastic container.
Slowly pour traces (2/3) of the ''Starting Powder'' onto the surface of the mold. ( below the lid)
Slowly pour traces (2/3) of the ''Starting Powder'' onto the surface of the mold. ( below the lid)
Step 8
Close the mold lid.
Use the Flint Ignitor to ignite the Starting powder at the lid opening to start the exothermic process.
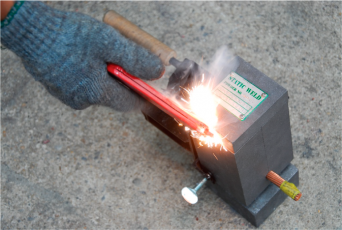
The welding process is on going.
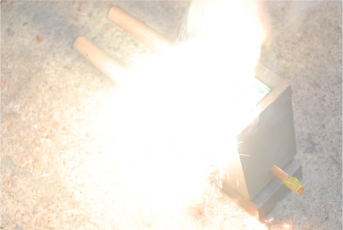
Caution ! Please wait for the mold to cool down sufficiently.
Do NOT pour water on to the mold.

Do NOT pour water on to the mold.
Unlock the clamp.
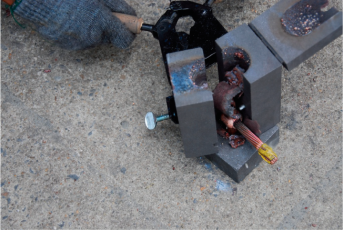
You have completed a Good welding connection.

Remember to clean the mold by gently rubbing the slag from the mold using a mold scraper and cleaning brush.
You are ready for the next connection.
WARNING !
DSSB products shall be installed and used only as indicated in our product instruction sheets and training materials. Instruction sheets are available upon request. Improper installation, misuse, misapplication or other failure to completely follow instructions and warnings may cause product malfunction, property damage, serious bodily injury and death.